
Instructions d’utilisation des Broncolor Siros 800 S WiFi / RFS 2
Les instructions d’utilisation suivantes pour les Broncolor Siros 800 S sont une reproduction des matériaux officiels du fabricant pour consultation rapide par PhotoRobot clients. Ces matériaux visent à soutenir la compréhension initiale et le fonctionnement indépendant de leur appareil Broncolor Siros 800 S. Cependant, sachez que les lumières Broncolor sont gérées directement dans PhotoRobot _Controls’application. Cela garantit qu’il n’est pas nécessaire d’installer de pilotes pour la gestion matérielle Broncolor côté client.
Pour les informations techniques sur les composants matériels, les outils logiciels, les modes principaux et les réglages recommandés pour les lumières Broncolor avec PhotoRobot, consultez PhotoRobot – Gestion des lumières Broncolor.
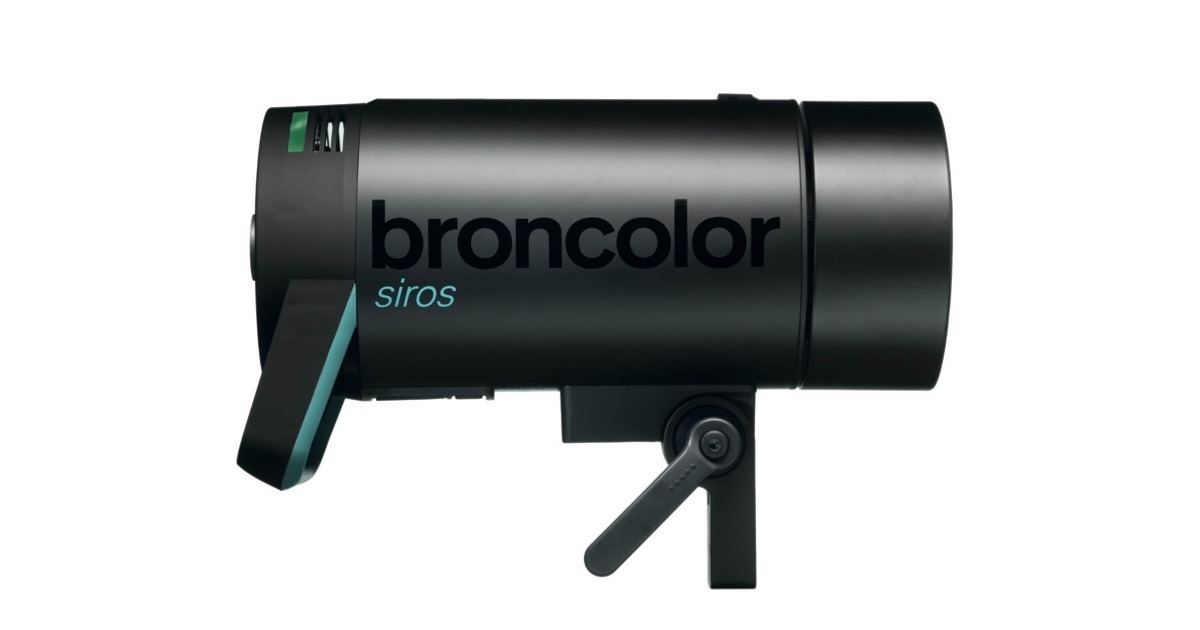
Note : Ces instructions d’utilisation sont une reproduction des instructions officielles du fabricant pour les lampes de studio Broncolor Siros 8 S série. Consultez le site web du fabricant, broncolor.swiss , pour la documentation originale de votre produit spécifique. En même temps, assurez-vous de respecter toutes les instructions fournies spécifiquement avec votre appareil avant sa première utilisation.
Commandes et affichages
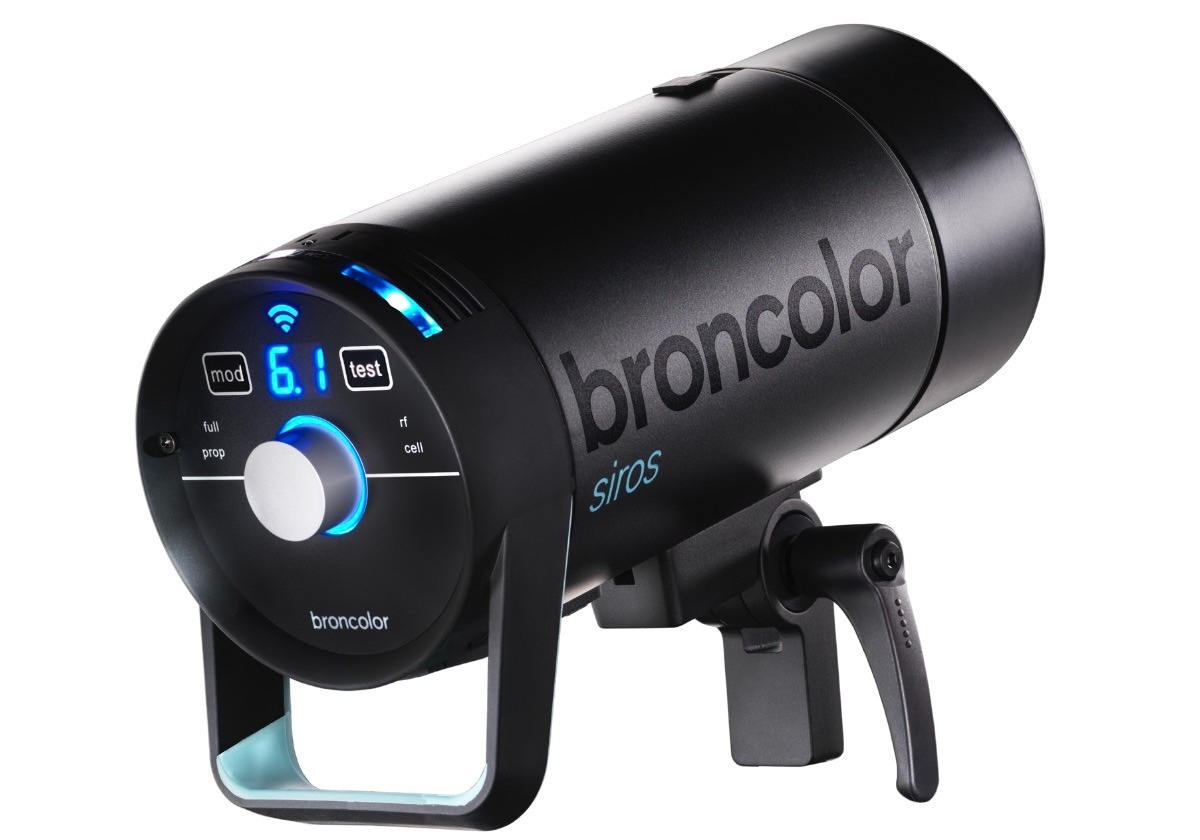
Les commandes et les affichages des Broncolor Siros 800 S sont les suivants.
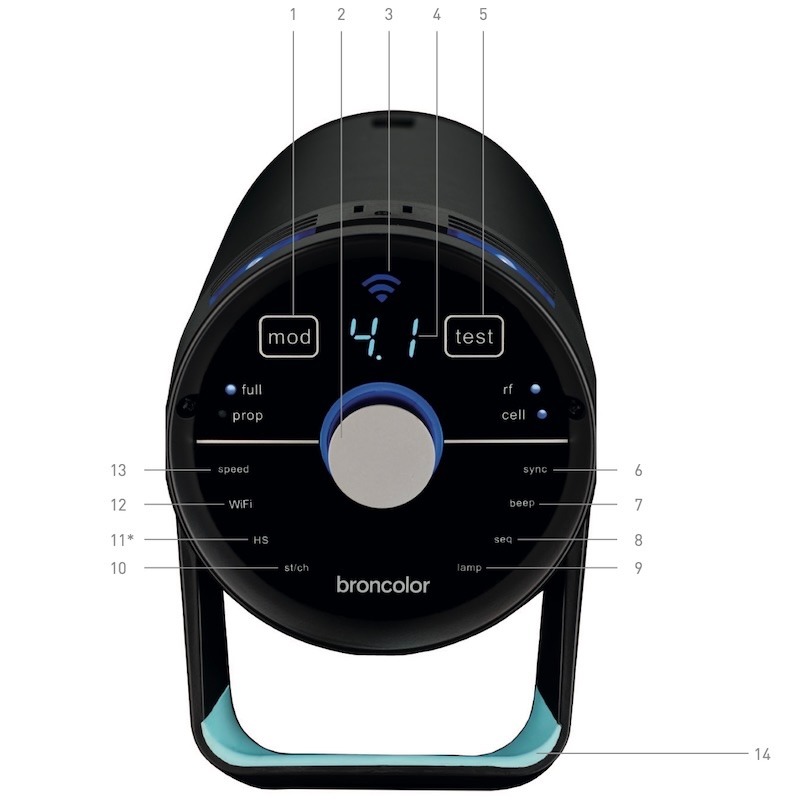
- Lumière de modélisation allumée/éteinte
- Contrôleur rotatif
- Affichage WiFi
- Affichage numérique de distribution d’énergie
- Clé « test »
- Paramètres du menu
- Paramètres du menu
- Paramètres du menu
- Paramètres du menu
- Paramètres du menu
- Paramètres du menu
- Paramètres du menu
- Paramètres du menu
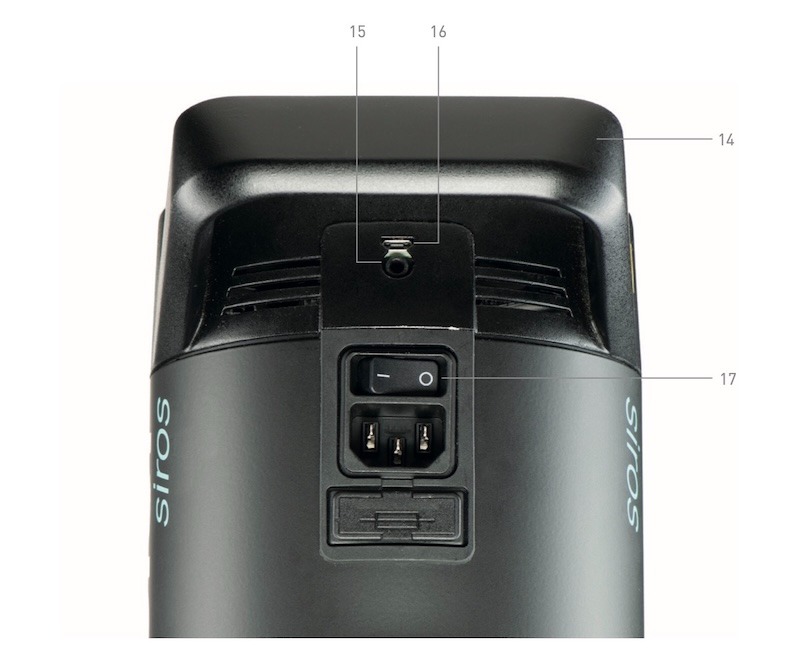
- Poignée
- Prise de synchronisation
- Mini USB
- Interrupteur secteur
Avant utilisation
Le Broncolor Siros S est un produit de haute qualité qui offre des années de service s’il est utilisé correctement. Veillez à lire attentivement toutes les informations contenues dans ces instructions d’utilisation, qui contiennent également des instructions importantes pour l’utilisation et l’entretien de l’appareil. Référez d’autres utilisateurs à ces instructions afin de familiariser les nouveaux utilisateurs avec l’appareil, son utilisation et son entretien. De plus, respectez toujours les instructions de sécurité fournies séparément de celles de Broncolor pour votre appareil.
Table des matières
- Champ d’application
- Première création
- Éléments de contrôle
- Aperçu des fonctions du menu principal
- Menu Navigation
- Contrôle des temps de clignotement
- Sortie
- Fonction HS
- Fonctions spéciales
- Informations et messages de faute
- FAQ
- Accessoires
- Entretien / Réparations
- Informations sur la protection de l’environnement
- Garantie et avis pour les clients britanniques
- Données techniques
1. Champ d’application de l’offre
1.1. Siros 800 S WiFi / RFS 2 – 31.643.XX
Tout d’abord, assurez-vous d’avoir reçu les articles suivants lors de la livraison.
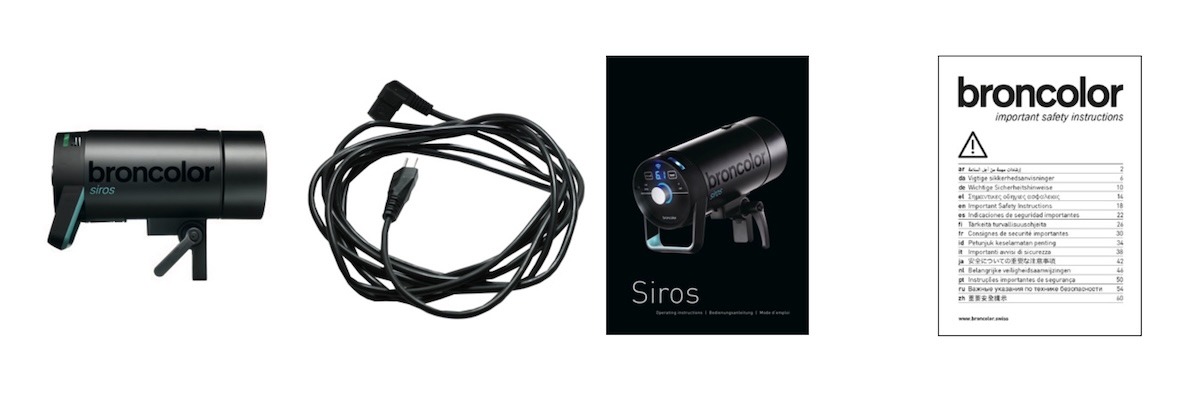
- Siros S Monolight
- Câble secteur
- Instructions d’utilisation (BA109.00)
- Instructions importantes de sécurité (WA-18-1)
1.2. Maillots
Le contenu du kit Siros Expert comprend :
- 2× Siros 800 S WiFi / RFS 2
- 1× Parapluie, 85 cm (33.574.00)
- 1× Softbox 60 x 60 (33.561.00)
- 1× Anneau de vitesse (33.401.00)
- 2× Tribune Junior AC (35.100.00)
- 1× Sac flash 2 (36.532.00)
- 1× Sac d’accessoires (36.535.00)
- 1× Câble de synchronisation (34.111.00)
Le contenu du kit Siros Pro comprend :
- 3× Siros 800 S WiFi / RFS 2
- 1× Softbox 60 x 60 (33.561.00)
- 1× Octabox 75 (33.600.00)
- 2× Anneau de vitesse (33.401.00)
- 2× Réflecteur standard L40 (33.115.00)
- 3× Tribune Junior AC (35.100.00)
- 1× Sac flash 3 (36.533.00)
- 1× Sac d’accessoires (36.535.00)
- 1× Câble de synchronisation (34.111.00)
2. Première création
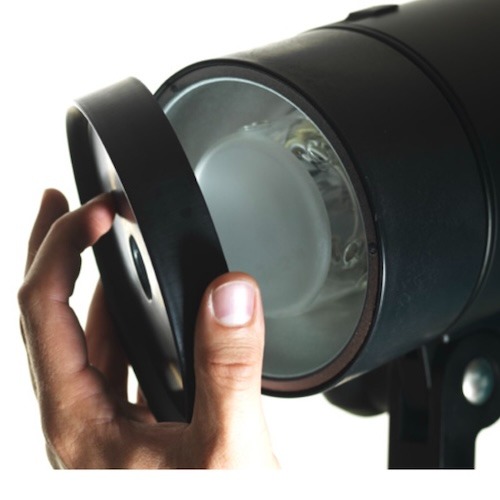
2.1. Retirer le couvercle protecteur
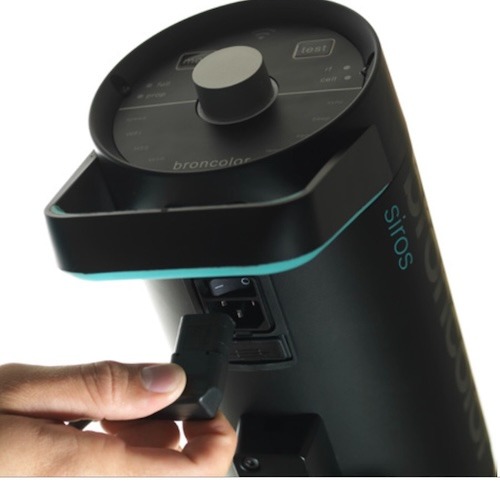
2.2. Brancher le câble secteur
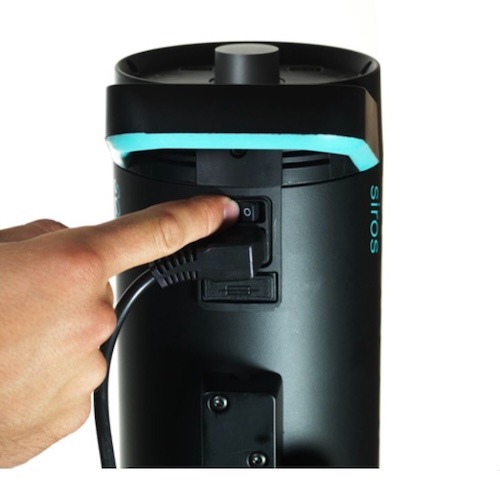
2.3. Allumez l’unité au niveau de l’interrupteur principal
3. Éléments de contrôle
3.1. Fonctions élémentaires
Contrôleur rotatif (2)

- Le contrôleur rotatif (2) sert à activer et éteindre l’unité (mode veille). Appuyer sur le contrôleur rotatif pendant 3 secondes permet de passer l’appareil en veille.
- Dans le menu, le contrôleur rotatif permet la navigation dans les menus et la confirmation des éléments du menu. Il y a une explication supplémentaire de la navigation dans les menus au chapitre 5.
- En fonctionnement, le contrôleur rotatif modifie l’énergie de l’éclair. Tourner dans le sens antihoraire réduit l’énergie de l’éclair, tandis que tourner dans le sens des aiguilles d’une montre l’augmente. Pendant ce temps, tourner lentement le contrôleur la modifie en pas de 1/10 de f-stop, et tourner rapidement (« tourner ») en pas de 1/1 de f-stop.
Affichage d’informations (4)
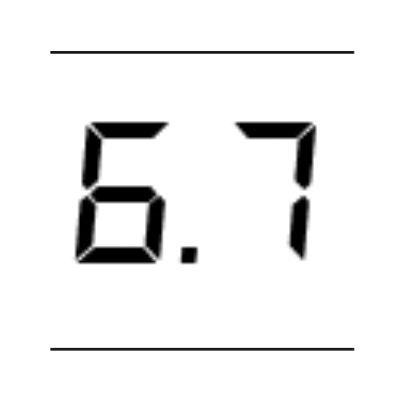
- L’affichage des informations (4) affiche l’énergie du flash sélectionnée, ou les options de sélection du menu.
Mod - Lumière de modélisation ALLUMÉE / ÉTEINTE (1)
- Utilisez le « mod » (1) pour allumer ou éteindre la lumière de modélisation. Une pression plus longue sur le bouton change le mode de fonctionnement de « plein » à « prop » ou inversement.
Test (5)

- Utiliser « test » (5) commencera un test. L’affichage « Prêt » autour du contrôleur rotatif passe au bleu dès que l’opération de charge/décharge est terminée.
3.2. Fonctions du menu
Vitesse (13)
- Le réglage du menu « vitesse » (13) est pour la charge rapide et les temps d’éclair. Trouvez une explication plus détaillée au chapitre 6 de ces instructions d’utilisation.
WiFi (12)
- « WiFi » (12) indique si le WiFi est activé ou désactivé.
HS (11)

- « HS » indique si HS est activé ou désactivé.
Studio / Chaîne (10)
- Le réglage du menu « st / ch » (10) sert à changer de studio / canal. Utilisez-le pour changer le canal de studio actuel (RFS 2).
Lampe (9)

- Utilisez la lampe de réglage du menu (9) pour sélectionner le canal de la lampe (RFS 2).
Séquence (8)
- Le réglage du menu « seq » (8) sélectionne le nombre de flashs.
Bip (7)

- La fonction de menu « bip » (7) indique si l’alerte acoustique « Prêt » est activée ou désactivée.
Synchronisation (6)
- L’utilisation de « sync » (6) permet de choisir différentes méthodes de libération (photocellule, radio, photocellule et/ou radio).
Prise de synchronisation / Mini USB (15 / 16)

- Utilisez les fonctions du menu Sync socket / Mini USB (15 / 16) pour la libération via le câble de synchronisation, ou la mise à jour logicielle via la mini USB.
On / Off (17)

- Utilisez l’unité marche/éteinte (17) pour l’allumer ou l’éteindre.
4. Aperçu des principales fonctions
Les principales fonctions sont les suivantes.
- Pour accéder au menu principal, appuyez sur la manette rotative (2).
- Tournez le contrôleur rotatif (2) dans le sens horaire ou antihoraire pour atteindre l’élément du menu requis.
- Pour confirmer votre sélection, appuyez à nouveau sur le contrôleur rotatif (2). L’élément du menu sélectionné commence à cligter.
5. Navigation dans le menu
Les fonctions du menu des Broncolor Siros 800 S incluent :
- Vitesse
- WiFi
- HS
- st/ch
- lampe
- seq
- bip
- synchronisation
Après avoir appuyé sur le contrôleur rotatif (2), vous entrez dans le menu principal du monolight. À partir de là, vous avez accès aux différentes fonctions.
Veuillez noter : si un élément de menu ne peut pas être sélectionné, comme pour des produits autres que le Siros 800 S, l’unité ne prend pas en charge cette fonction.
Exemple : Fixez une séquence de 15 flashs par relâchement.
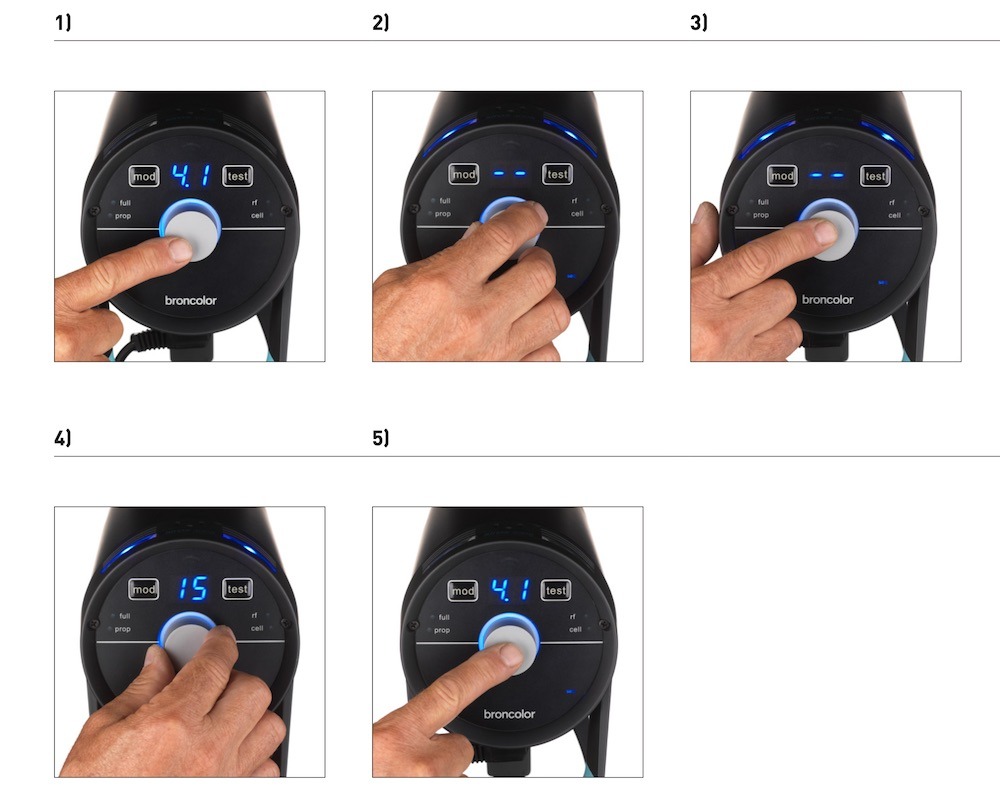
- Appuyez sur le contrôleur rotatif (2) pour accéder au menu principal. L’élément du menu sélectionné en dernier sera affiché. L’affichage principal passe de l’affichage de la puissance de sortie à l’élément du menu sélectionné.
- Tournez le contrôleur rotatif (2) jusqu’à atteindre l’élément du menu « seq ».
- Appuyez sur le contrôleur rotatif (2) pour confirmer cette fonction. L’affichage « seq » commence à clignoter rapidement.
- Tournez le contrôleur rotatif (2) jusqu’à ce que « 15 » apparaisse sur l’écran principal.
- Confirmez cette sélection en appuyant sur le contrôleur rotatif (2). Après cette confirmation, l’appareil passe à son état normal. Si la sélection n’est pas confirmée dans les 5 secondes, l’appareil passe à son état normal sans modifier son réglage.
6. Contrôle des temps de clignotement
Dans le menu principal, vous pouvez définir le temps de flash du monolight sur « speed ». Ce réglage calcule le temps de flash le plus rapide possible pour le niveau d’énergie choisi. Cela peut aussi faire légèrement décaler la couleur du flash vers la région bleue.
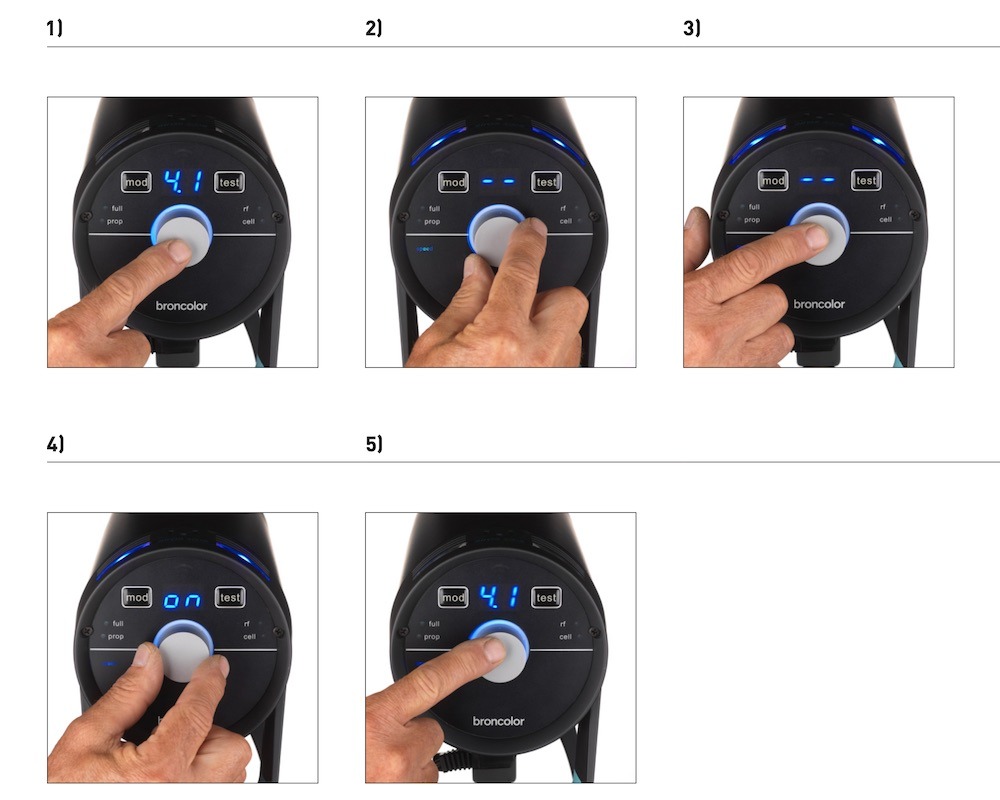
- Appuyez sur le contrôleur rotatif (2) pour accéder au menu principal.
- Tournez le contrôleur rotatif (2) jusqu’à atteindre l’élément du menu « vitesse ».
- Confirmez cette sélection en appuyant sur le contrôleur rotatif (2).
- Utilisez le contrôleur rotatif (2) pour sélectionner l’option « on » ou « off ».
- Confirmez cela avec le régulateur rotatif (2).
7. Libération
7.1. Module RFS 2 (Système de radiofréquence)
Pour le contrôle du flash RFS 2, le canal (adresse du studio) doit correspondre au canal de l’émetteur. L’adresse du studio est définie dans le menu à la position « st ». Le canal de la lampe est défini dans le menu sous « lampe ». Voir la section 9.3 pour plus d’informations sur le changement des couleurs des lumières de cognition.
Avec l’émetteur-récepteur radio, vous pouvez définir et régler les lampes individuelles comme vous le souhaitez. Pour savoir comment faire, veuillez consulter les instructions d’utilisation de l’émetteur-récepteur. L’émetteur-récepteur n’est pas standardément inclus avec des têtes individuelles.
7.2. Photocellule (cellule)
La cellule photoélectrique peut être allumée ou désactivée en utilisant la fonction de menu « sync » (6). Lorsque celle-ci est active, la LED bleue à côté de l’étiquette « cell » s’allume. Après le premier clignotement d’une séquence, la cellule photoélectrique active est désactivée, et la LED bleue à côté de la touche « sync » (6) clignote. Appuyer sur la touche « test » la rallume.
7.3. Socket de synchronisation (15)
Les câbles de synchronisation – 5 m (16,4 ft) (Art. N° 34.111.00) et 10 m (32,8ft) (34.112.00) – peuvent être fixés sur la prise pour le déverrouillage du câble (15).
7.4. Clé « test » (5)
Grâce à cette touche, la monolumière peut être déclenchée manuellement. Le flash peut être déclenché dès que 70 % du niveau d’énergie défini est atteint. L’indicateur visuel « Prêt », en revanche, ne s’allume que lorsque 100 % est atteint.
8. Fonction HS
En combinaison avec l’émetteur RFS 2.2, vous pouvez utiliser le Siros 800 S monolight avec des vitesses d’obturation extrêmement rapides. Par exemple, avec la lumière ambiante, même avec l’ouverture à fond ouverte (mise au point sélective), l’image peut être sous-exposée correctement jusqu’à 1/8000s, et Siros permet toujours de définir des effets lumineux dominants et créatifs.
Tout ce dont vous avez besoin pour cela, c’est l’émetteur RFS 2.2, disponible pour les appareils Canon, Fuji, Nikon et Sony. De plus, le HS doit être activé sur tous les appareils Siros. Cela modifie la courbe du flash et garantit, en combinaison avec le RFS 2.2, une exposition correcte sans limitation de la vitesse d’obturation.
Veuillez lire les instructions de fonctionnement de l’émetteur RFS 2.2 pour en savoir plus sur l’utilisation optimale de la fonction HS.
En travaillant en mode HS, vous ne pouvez utiliser que le niveau de puissance flash 4 à 10 avec Siros.
9. Fonctions spéciales
9.1. Réinitialisation (vers les paramètres d’usine)
Appuyez sur la touche « test » (5) pendant 4 secondes. Cela réinitialise toutes les fonctions aux paramètres d’usine. La réinitialisation est confirmée par un double bip.
9.2. Paramètres de l’application et du WiFi « bronControl »
Pour contrôler votre monolumière Siros, vous pouvez également télécharger gratuitement l’application « bronControl ». Pour trouver l’application, cherchez « bronControl » sur l’App Store d’Apple ou sur le Play Store de Google.
9.2.1. Modes de fonctionnement
9.2.1.1. Fonctionnement en mode « privé » (réglage d’usine)
Si le mode WiFi est activé sur plusieurs monolampes, ces appareils se connectent automatiquement avec la même adresse de studio pour former un réseau privé. Un smartphone ou une tablette doit alors être connecté à ce réseau pour le contrôler. Pour l’utiliser, activez la fonction WiFi sur votre smartphone ou tablette. Votre appareil recherchera alors automatiquement les réseaux WiFi disponibles. Connectez votre smartphone ou tablette au réseau Bron-Studio approprié. Le mot de passe de connexion est : bronControl. Lancez maintenant l’application « bronControl » sur votre appareil. Ajoutez le numéro de studio approprié sous « ajouter un nouveau studio » et connectez l’application à ce studio. Pour plus d’instructions sur le fonctionnement, veuillez utiliser la fonction d’aide « ? » dans l’application.
9.2.1.2. Fonctionnement en mode « Enterprise »
S’il existe un réseau WiFi (routeur), l’appareil peut être intégré à ce réseau via un smartphone ou une tablette. Pour cela, dans l’application « bronControl », dans les paramètres, allez dans « Paramètres réseau » et entrez les paramètres de votre routeur en mode « entreprise ». Assurez-vous que les unités sont configurées à la bonne adresse de studio. Siros enregistre le dernier type de connexion et tente de se connecter au dernier réseau lors du prochain démarrage.
9.2.2. Paramètres du menu
Les paramètres du menu sont définis comme suit : allumé / désactivé / synchronisé (allumé / -- / sy).
9.2.3. Affichage WiFi (3) sur l’unité
Les symboles et leurs descriptions pour l’affichage Wifi (3) sur l’unité sont les suivants.
9.3. Lumières cognitives
Lorsque les différents canaux de lampe sont sélectionnés (zones), la lumière de cognition sur la surface supérieure de l’appareil change de couleur. Le but est de différencier les unités individuelles lorsqu’elles sont contrôlées par l’application « bronControl ». La lumière de l’appareil change de couleur lorsque l’application est activée sur un smartphone ou une tablette ou lorsque la manette rotative de l’appareil est pressée ; elle redevient bleue en quittant le menu.
Les couleurs des canaux de lampe sont les suivantes.
10. Informations et messages de faute*
10.1. Signaux acoustiques
Les signaux acoustiques sont un bip ou un double bip.
10.2. Message à l’affichage
Note : *Les messages d’erreur sont toujours également indiqués par la lumière rouge de la cognition.
11. FAQ
11.1. Changement des tubes flash
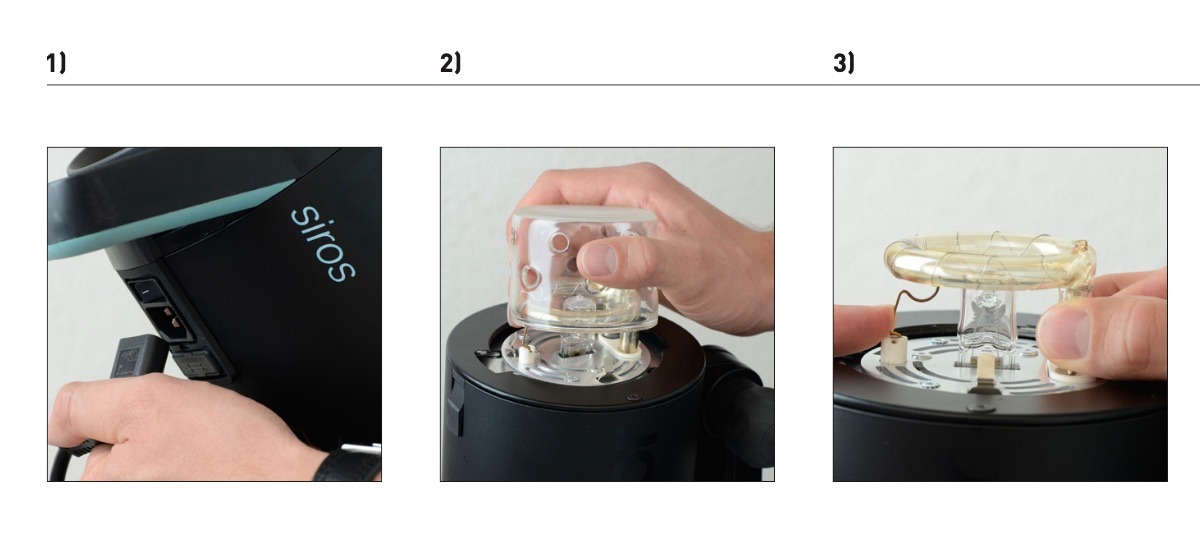
- Débranchez le câble secteur de l’appareil.
- Retirez le verre de sécurité en le retirant de ses attaches de retenue.
- Appuyez sur le ressort de contact vers le bas et tirez le tube flash avec précaution.
11.2. Changement du fusible
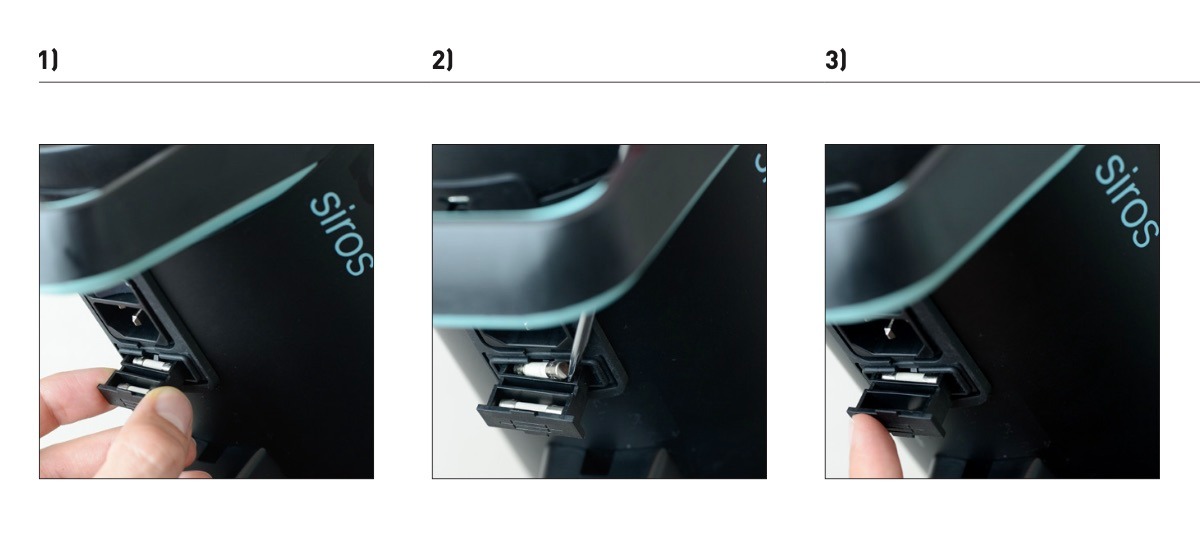
- Débranchez le câble secteur de l’unité (voir image 1 ci-dessus). Ouvrez le compartiment à fusibles sous l’appareil.
- Retirez soigneusement la mèche grillée avec un objet pointu.
- Insérez le fusible de remplacement et refermez le compartiment à fusibles
11.3. Modification des Façonneurs de Lumière
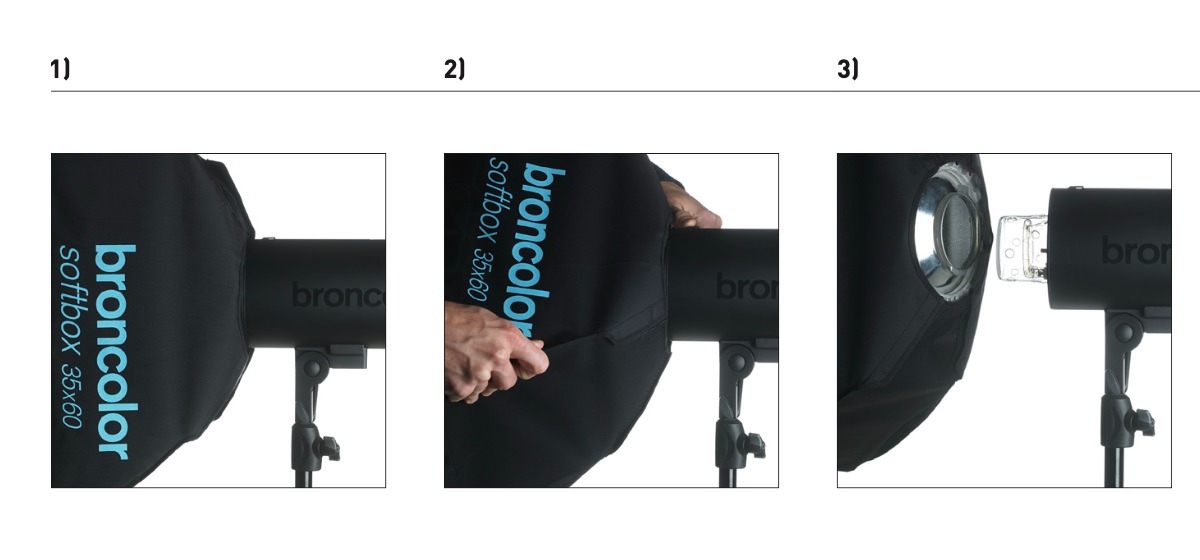
- Tournez le modeleur de lumière dans un sens ou dans l’autre jusqu’à son arrêt.
- Tirez le dégagement vers l’arrière et, en même temps, tournez le modeleur de lumière jusqu’à ce qu’il soit libre du raccord de la baïonnette.
- Retirez délicatement le modeleur de lumière vers l’avant. Faites attention à ne pas abîmer le verre de sécurité.
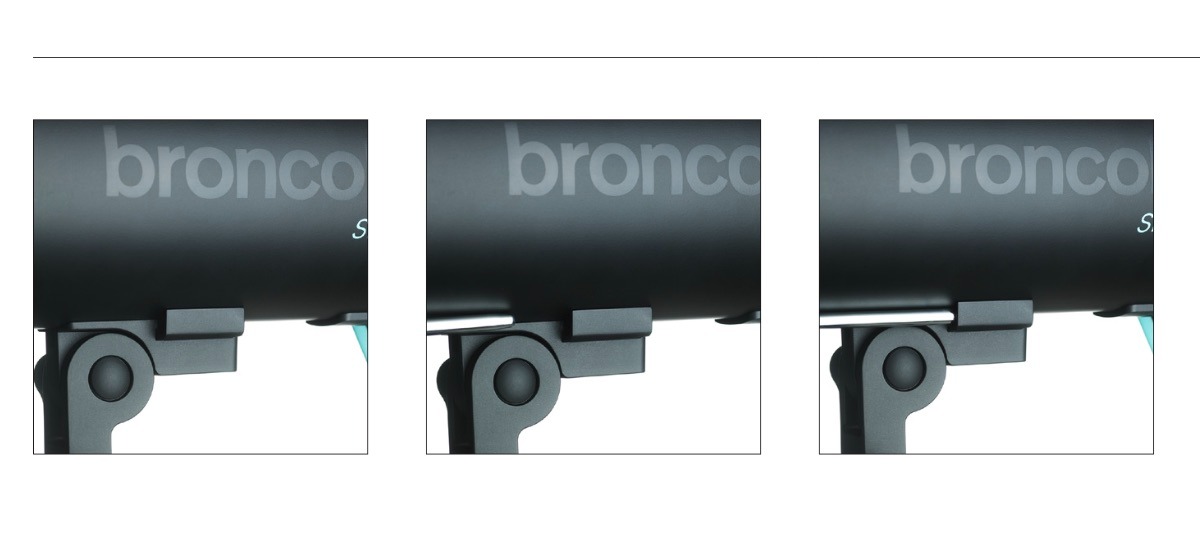
11.4. Monter un parapluie
Pour monter le parapluie, montez-le dans l’ouverture prévue sous l’unité.
12. Accessoires
Siros est compatible avec toute la gamme de modeleurs de lumière broncolor.
Les articles suivants représentent des accessoires spécialement recommandés :
13. Entretien et réparations
Votre monolight Broncolor est un instrument de précision, capable de permettre des années de fonctionnement sans problème lorsqu’il est traité avec les soins appropriés. Cependant, en cas de panne, veuillez ne pas essayer d’ouvrir l’appareil pour le réparer vous-même. Même lorsque l’appareil est éteint, il peut y avoir des niveaux de tension dangereux à l’intérieur. Par conséquent, pour l’entretien et les réparations, envoyez toujours l’appareil à votre point de service Broncolor.
14. Informations sur la protection de l’environnement
À la fin de sa durée de vie utile, ce produit ne peut pas être éliminé comme un simple déchet domestique. Il doit plutôt être emmené à un point de collecte pour le recyclage des appareils électriques et électroniques. Les matériaux sont recyclables selon leurs marquages. En réutilisant, en recyclant ou en utilisant d’autres appareils anciens, vous apportez une contribution importante à la protection de notre environnement.
Veuillez demander à vos autorités locales ou à un partenaire commercial Broncolor le point d’élimination approprié.
15. Garantie
Tous les groupes électriques, lampes, monolights et accessoires Broncolor sont fabriqués selon une haute qualité standard. Broncolor offre une garantie usine de deux ans à partir de la date d’achat (pour le premier propriétaire) sur les produits broncolor mentionnés. Sont exclus de cette garantie les tubes flash, lampes halogènes, lunettes de sécurité, câbles, batteries et textiles. Les défauts résultant du non-respect des instructions de sécurité, d’une mauvaise manipulation, de l’utilisation d’accessoires d’un autre fabricant, d’une intervention ou modification non autorisée sont exclus de la garantie d’usine. Broncolor / PhotoRobot n’assume aucune responsabilité pour les dommages résultant du non-respect des consignes de sécurité, une mauvaise manipulation, l’utilisation d’accessoires d’un autre fabricant ou une intervention ou modification non autorisée. En cas de problème technique, veuillez contacter immédiatement la station de service autorisée Broncolor la plus proche. Les numéros d’article, descriptions de produits et l’étendue de la fourniture peuvent varier d’un pays à l’autre. Pour plus d’informations détaillées, veuillez contacter votre partenaire commercial Broncolor. Erreurs et fautes d’impression exceptées.
16. Avis pour les clients britanniques
Cet appareil peut être configuré pour se connecter à un réseau LAN sans fil. Veuillez configurer ce produit pour se connecter à une infrastructure sécurisée. N’utilisez pas le mode de configuration pour un fonctionnement normal.
- Rapports sur les vulnérabilités de sécurité : support@broncolor.swiss
- Temps de réaction : 30 jours
- Période de support définie au Royaume-Uni : 2 ans après la date de vente, applicable uniquement aux produits vendus au Royaume-Uni (sauf en Irlande du Nord) à partir du 29 avril 2024
- Nom du fabricant : Bron Elektronik AG
- Adresse du fabricant : Hagmattstrasse 7, 4123 Allschwil, Suisse
17. Données techniques


Série EOS Rebel


Série EOS DSLR


Série EOS M sans miroir


Série PowerShot


Gros plan / À main levée

La série Canon EOS Rebel propose des appareils photo reflex numériques adaptés aux débutants avec une qualité d’image solide, des commandes intuitives et des fonctionnalités polyvalentes. Idéal pour les amateurs de photographie, ces appareils photo offrent une mise au point automatique fiable, des écrans tactiles orientables et un enregistrement vidéo Full HD ou 4K.
Connexion
Résolution (MP)
Résolution
La série Canon EOS DSLR offre des images de haute qualité, une mise au point automatique rapide et une polyvalence, ce qui la rend idéale pour la photographie et la production vidéo.
Connexion
Résolution (MP)
Résolution
La série Canon EOS M Mirrorless combine un design compact avec des performances similaires à celles d’un reflex numérique. Dotés d’objectifs interchangeables, d’un autofocus rapide et de capteurs d’image de haute qualité, ces appareils photo sont parfaits pour les voyageurs et les créateurs de contenu à la recherche de portabilité sans sacrifier la qualité d’image.
Connexion
Résolution (MP)
Résolution
La série Canon PowerShot propose des appareils photo compacts et conviviaux pour les photographes occasionnels et les passionnés. Avec des modèles allant du simple appareil photo compact aux appareils photo zoom avancés, ils offrent commodité, une qualité d’image solide et des fonctionnalités telles que la stabilisation d’image et la vidéo 4K.
Connexion
Résolution (MP)
Résolution
Les appareils photo rapprochés et portables de Canon sont conçus pour la photographie et la vidéo détaillées et rapprochées. Compacts et faciles à utiliser, ils offrent une mise au point précise, une imagerie haute résolution et des capacités macro polyvalentes, parfaites pour le vlogging, la photographie de produits et les gros plans créatifs.


